

Roof flashing is a crucial component of a well-maintained roof, protecting your home from water damage by sealing joints and directing water away from vulnerable areas. When flashing becomes damaged or worn, it can lead to leaks, rot, and costly repairs. This blog will guide you through expert tips for repairing roof flashing effectively, ensuring your home remains secure and dry.
What is Roof Flashing?
Roof flashing is a thin material, typically made of aluminum, galvanized steel, or copper, installed to direct water away from critical areas such as chimneys, skylights, vents, and roof valleys. By sealing joints and directing water flow, flashing prevents moisture infiltration and structural damage. Without properly installed flashing, even a small gap can allow water to seep into your home, leading to hidden damage over time. Understanding the role and types of flashing ensures you know how to protect your roof effectively.
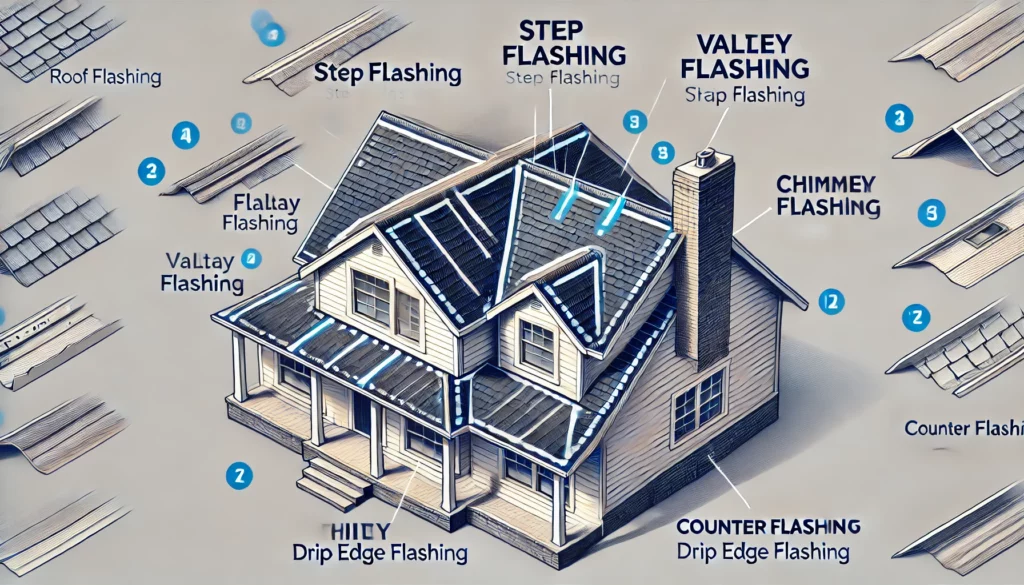
Common Types of Roof Flashing:
- Step Flashing: Used where the roof meets a vertical wall. Step flashing overlaps shingles, ensuring water flows away from the roof-wall intersection.
- Counter Flashing: Installed over step flashing for additional protection. Counter flashing shields the underlying step flashing from direct exposure.
- Valley Flashing: Protects roof valleys where two roof planes intersect. Valley flashing channels rainwater into gutters, preventing pooling in low spots.
- Drip Edge Flashing: Guides water away from the edges of the roof. Drip edges also protect the fascia and underlying roof components.
- Chimney Flashing: Specifically designed for areas around chimneys. Proper chimney flashing includes both base flashing and counter flashing to prevent leaks.
Signs Your Roof Flashing Needs Repair
Before jumping into repairs, it’s important to identify when flashing issues arise. Here are the top signs:
- Visible Cracks or Holes: Damaged flashing often exhibits gaps or corrosion. Even small cracks can grow over time, allowing water to seep in and cause extensive damage.
- Water Stains: Stains on ceilings or walls indicate leaks from faulty flashing. Look for discoloration or peeling paint, which are telltale signs of moisture intrusion.
- Rust or Deterioration: Rusted or corroded flashing loses its effectiveness. Regular inspections can help you catch rust early before it compromises the entire flashing.
- Loose or Missing Sections: Flashing that has come loose or blown away leaves your roof vulnerable. This often happens after strong winds or heavy storms.
- Peeling Paint or Mold Growth: Moisture buildup due to flashing issues can lead to mold and paint damage. Mold not only affects aesthetics but can also pose health risks.
Essential Tools and Materials for Flashing Repair
To repair roof flashing effectively, gather the following tools and materials:
- Pry bar
- Hammer and roofing nails
- Roofing cement or sealant
- Flashing material (aluminum, steel, or copper)
- Utility knife or tin snips
- Measuring tape
- Ladder and safety harness
Using the right tools ensures that your repairs are both safe and durable. Always double-check the compatibility of your flashing material with your existing roof. Additionally, investing in high-quality sealants can make a significant difference in the longevity of your repair work. Safety gear, such as a harness, is essential for working on elevated surfaces to prevent accidents.
Step-by-Step Guide to Repairing Roof Flashing
Follow these steps for a successful flashing repair:
1. Assess the Damage
Inspect your roof to determine the extent of the damage. Identify cracks, rust, and areas where flashing is loose or missing. Use binoculars for a safer preliminary check. Pay extra attention to areas prone to water accumulation, such as roof valleys and around chimneys. Documenting the damage with photos can also help you plan your repair.
2. Remove Damaged Flashing
Carefully pry away damaged flashing using a pry bar. Be cautious not to damage adjacent shingles or roofing materials. Removing old nails and sealant is crucial to ensure the new flashing adheres properly. Take your time with this step to avoid creating additional problems.
3. Cut and Fit New Flashing
Measure the area requiring repair and cut a new piece of flashing to size. Use a utility knife or tin snips for precise cuts. Ensure the new flashing fits snugly without leaving any gaps. Overlapping pieces slightly can enhance water resistance.
4. Secure the Flashing
Position the new flashing in place and secure it with roofing nails. Ensure nails are driven into a sturdy surface to hold the flashing firmly. Avoid placing nails in areas where water might pool, as this could lead to leaks.
5. Seal the Edges
Apply roofing cement or sealant along the edges of the flashing to create a watertight seal. Smooth the sealant for an even finish. Ensure there are no gaps or air bubbles in the sealant for maximum effectiveness.
6. Inspect and Test
After the repair, inspect your work for gaps or loose edges. Test the flashing by pouring water over it to check for leaks. Address any weak spots immediately to avoid future problems.
Expert Tips for Long-Lasting Flashing Repairs
Choose Quality Materials: Invest in durable flashing materials like copper or galvanized steel for longevity. High-quality materials withstand harsh weather conditions better than cheaper alternatives.
- Check Surrounding Areas: Inspect nearby shingles and roofing components for damage. Weak shingles can compromise the effectiveness of new flashing.
- Regular Maintenance: Schedule periodic roof inspections to catch and address issues early. Proactive maintenance saves money in the long run.
- Hire a Professional: For complex repairs or steep roofs, consult a licensed roofing contractor. Professionals have the experience and tools to handle intricate repairs.
- Avoid Overnailing: Too many nails can compromise the integrity of the flashing. Proper placement ensures durability without risking leaks.
Preventative Measures to Protect Your Roof Flashing
- Keep Gutters Clean: Clogged gutters can lead to water backup and flashing damage. Regularly cleaning gutters prevents unnecessary strain on your roof.
- Trim Overhanging Branches: Prevent branches from scratching or dislodging flashing. Overhanging branches also drop debris that can cause buildup on the roof.
- Monitor Roof Traffic: Minimize foot traffic to reduce wear and tear on flashing. If roof access is necessary, use walk boards to distribute weight evenly.
- Apply Protective Coatings: Use corrosion-resistant coatings on metal flashing. This adds an extra layer of defense against the elements.
Why Timely Flashing Repairs Matter
Ignoring flashing issues can lead to:
- Costly Repairs: Water damage can compromise your home’s structural integrity. Repairing flashing is much more affordable than addressing widespread water damage.
- Energy Loss: Leaks affect insulation efficiency, raising energy bills. Sealing gaps promptly helps maintain consistent indoor temperatures.
- Decreased Property Value: Visible roof damage deters potential buyers. Keeping your roof in good condition boosts curb appeal and property value.
Timely repairs save money and ensure your home’s safety and value. Acting quickly prevents minor problems from escalating into significant issues that demand extensive repairs.
Conclusion
Roof flashing repair is essential for maintaining a leak-free, secure home. By identifying damage early and following expert repair tips, you can prolong your roof’s lifespan and avoid expensive repairs. If in doubt, always seek professional assistance to ensure the job is done right. Don’t wait—seal the deal on your roof’s protection today!


